Delay timers schedule the amount of time that elapses between sequence communications and / or processes. The delay timer is very flexible giving you a great deal of control over when a communication is sent to a contact. It allows you to simulate personal communications by limiting the schedule to acceptable days (e.g. excluding weekend days) and the acceptable time of day (e.g. within normal working hours.)
Note: Delay Timers are sequential. They run in order based on their position in the sequence and the individual timer settings. The first timer must run before the second, the second before the third, and so on, regardless of the individual timer settings. Thus changing a Delay timer in an active sequence will affect the order in which the timers run, and can cause contacts to drop.
A delay timer of 1 day will not wait a full 24 hours, it will occur on the next calendar date.
- Double-click on the campaign sequence you wish to edit or drag and drop a new campaign sequence onto the canvas.

Pro Tip!
Only one type of timer can be used per "Start" button. Meaning, no Start > Email > Delay Timer > Task > Date Timer. The Date Time would need to be on it's own "Start" button.

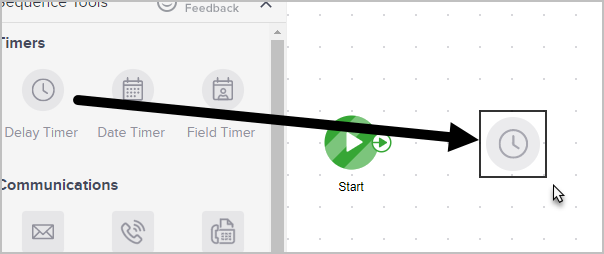
- Drag a Delay Timer onto the canvas and double-click it to configure.
- Double-click the timer to configure it. As you modify the timer settings, the summary updates so you can confirm the revised schedule before saving it.
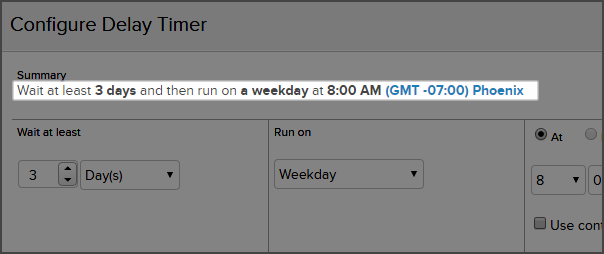
- Wait at least: The wait settings configure the minimum required delay for the next sequence piece(s). Use the arrows to choose a numerical value and then select a unit of time from the drop-down.
- If minutes or hours are selected, the timer will schedule the following sequence piece on the same day, as long as the Run on setting has not been passed for that day. If it has, then the automation will continue on the next acceptable day and time.
- The Week Day(s) option does not include Saturday or Sundays when scheduling the next step in your automation.
- Run on: The run settings allow you to choose acceptable days, weeks, and / or months. They configure the day and date limitations. The wait settings are taken into account first, then the system looks at the run settings to identify the first acceptable day or date. These settings are very flexible, so you should check the timer summary updates to verify they are configured as expected.
- Weekday: This limits the acceptable days to Monday, Tuesday, Wednesday, Thursday, or Friday. If the wait setting alone would schedule a piece to go out on Saturday, the run setting will make sure the piece does not go out until the following Monday.
- Weekend: This limits the acceptable days to Saturday and Sunday and will hold sequence pieces until one of these two days.
- Day Of Week: This allows you to define a limited number of acceptable days based on their position in the month, specific day(s), and /or specific month(s). If you use this setting, the timer will delay the specified wait time, then run on the next acceptable day you define here.
- Day of Month: This allows you to define a limited number of acceptable calendar dates based on their position in the month, specific day(s), and /or specific month(s). If you use this setting, the timer will delay the specified wait time, then run on the next acceptable date that you define here.
- At or Between: The At / Between setting allows you to define the acceptable time, or window of time, for the sequence pieces to run (based on the time zone of the contact record or the global time zone you set in your app in Admin > Settings) The between option is only available when the time unit assigned to the wait setting is minutes or hours or if "no delay" is selected. This setting makes it easy for you to confine automated communications to the hours associated with a standard work day.
- Use Contact's Time Zone: Allows you to delay actions to run at a specific time of day according to each contact's time zone. If this is not selected, or if the contact does not have a time zone listed on their record, the timer will default to the application time zone.
- Wait at least: The wait settings configure the minimum required delay for the next sequence piece(s). Use the arrows to choose a numerical value and then select a unit of time from the drop-down.
- Click Save to apply the revised timer schedule.
- Repeat this process to configure or modify the schedule for the rest of the sequence timers.


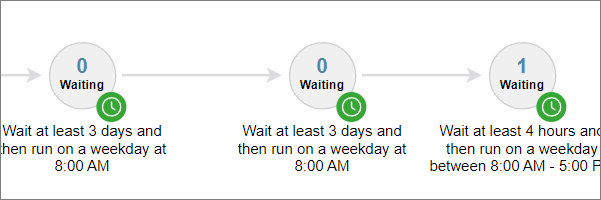
Pro Tip! If you connect multiple timers to each other, without adding any processes between them (or if the processes are not published), the contact will show as waiting on the final timer in the series. However, the process that comes after the final timer won't run until the combined time of all the timers has been completed. In the below example, that would be 6 days and 4 hours after 8 AM.