You are able to add product options to an existing product record. These options give your customers the ability to select preferences when purchasing from an order form or from the shopping cart. You can also adjust pricing based on a product option selected (e.g. Charge $2 more for a large or extra large shirt.)
You can pre-define a drop-down list for each option (e.g. a list of colors) or allow the buyer to type in an option (e.g. initials to be embroidered.)
Please note: Product options are only available to your customers when they are browsing your shopping cart or if you use order forms. Product options are not available when sending product purchase links.
Important Note! There can only be up to 3 product options, per product. These options will only be reported in the order itself, and in fulfillment reports. Also, if a customer has a product that has options and tries to complete a purchase through the shopping cart using the direct product link instead of the product's shopping cart storefront page, the order will error out, and create an invoice without charging.
- Go to E-Commerce > Products in the main navigation menu
- Click on the name of a product to edit it, then click on the Product Options tab.

- Enter the Name (e.g. Size.) The customer will see this name when they view the product in the Max Classic storefront.
- Select the Option Type:
- Selected from a Fixed List: This creates a drop-down list and the customer chooses from your list of options (i.e. small, medium, large, extra large.) The customer can't add to or change this list.
- Variable (option is typed by the end-user): This creates a text field and the user enters information into it that is specific to their situation (e.g. monogram initials.)
- Set the Required field. It is set to Yes by default. This means the customer must select a preference before checking out. Select No if the product option information is not required.
- Enter the option values and click the Add button.
- For option type Fixed List, see Step 7.
- For option type Variable, see Step 8.
- If the option type is a Fixed List, enter the option values.

- The value name appears in the drop-down list your customers see on an order form or on the shopping cart storefront.
- The Code is used as a SKU for that option and appears in the fulfillment report and on the order receipt.
- (Optional) Enter a dollar amount for the price adjustment if the value (e.g. Extra Large) costs more or less than the standard price. Note: The amount you enter is added to the standard product or subscription plan price by default. Select Subtract from the original price to lower the price instead.
- Once the values have been added, you can use the arrow buttons to reorganize them on the drop-down list.

- If the Option Type is Typed by the end-user, you will define variable settings instead of values.
These settings restrict what the customer can enter into the field. The variable settings help you minimize the number of invalid entries. The error message is displayed to customers when the product option entry does not comply with the variable settings.
- After you enter the variables, click the Save button.
- Repeat this process to add more product options.
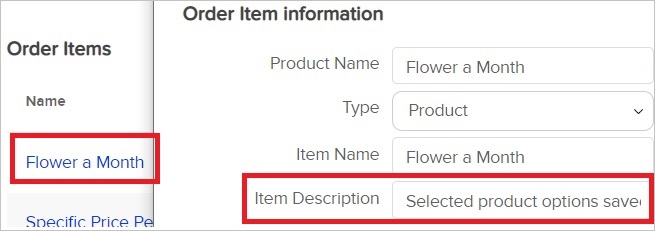
Pro-Tip: The specific product options that were input into the order form or shopping cart by the customer, can be viewed in the Order record itself by clicking on the Order Item, and it will be stored within the Item Description field. If your item already has a description, you may need to scroll to the right to view the saved Product Option. Customer input Product Options can also be viewed via a Fulfillment Report.
